
(Click here if you just wanna see pix of my costume, or click here if you just want to see “making of pix”)
So my long tradition of ridiculously ambitious Halloween costumes continued this year with my second attempt at a dinosaur (to see more, click here for a quick summary or here for all the pics). I did pretty well – I give it a B-.
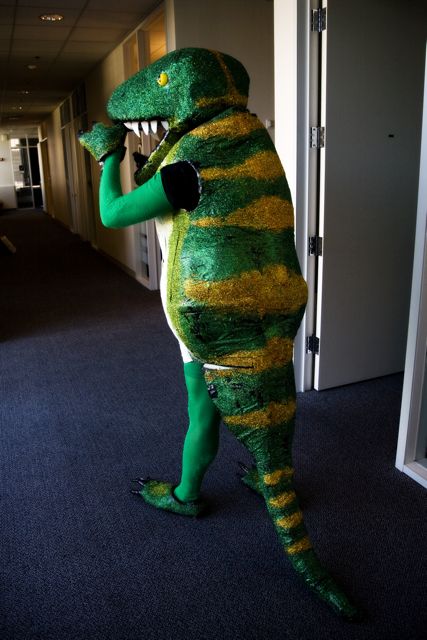
(click the picture to see all the pix)
The genesis of this year’s dino, other than my general fascination with the beasties, was the last dino costume, the Deepasaurus (from Halloween 2006). While parts of it worked well (the head!), the totality of the costume left a LOT to be desired. As my friend Peat generously put it at the time “It’s a good 1.0” 🙂 Ironically, just as I was finishing that costume, I realized how to make it much better, and with MUCH less effort!
So now, 3 years later – I tried it.
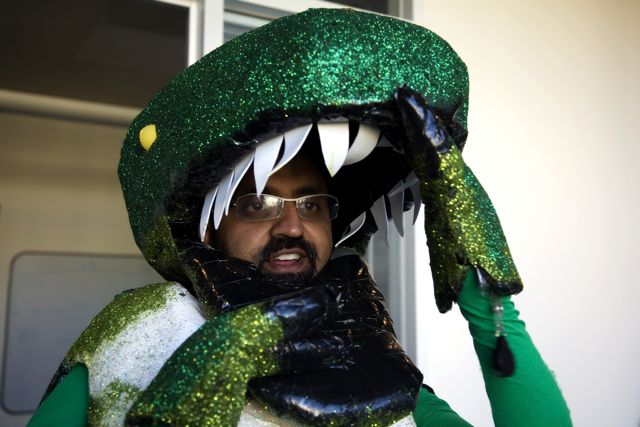
(click the picture to see all the pix)
What I ended up creating, while much better than Dino 1.0, was a far cry from what I wanted (I made some mistakes!), but still I can’t really complain. It looked great in the end! My costumes are always an iterative process anyway… and I’m pretty happy with Dino 2.0 – The Glamosaur!
Read on if you want to know how I did it…
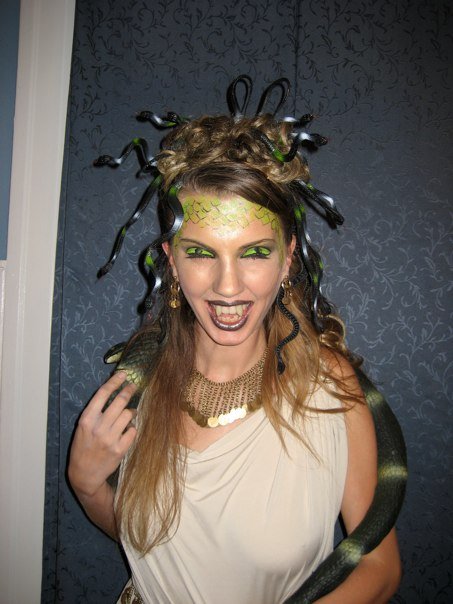
Before I go any further though, I should also give a shout out to my co-conspirator Catherine Tullner! I usually do these things solo, but as Cath is the best costume maven I know, I couldn’t resist having her help me out & she was HUGE help! Here’s her Halloween costume – fantastic!
[Ed. Note: before reading further, I STRONGLY RECOMMEND opening this link (to the Making of pix) in a separate window so you can follow along with the pix as you read what follows.]
So the key to my idea of a dinosaur costume is making the bulk of the beast. The last time I tried that by stacking foam – which turned out to be a bad idea 🙂 One of the biggest points of failure of this “stacked” method was the tail. I made a tail that way for the last dino & days before I was done I realized that it was horribly problematic & essentially my dino had no tail! I scrambled and came up with another tail idea involving a foam “noodle”, like the ones kids use for swimming (at the local hardware store, the sell hollow ones to wrap pipes). I basically just wrapped carpet foam around one of these noodles & voila, I had a tail….
Immediately, I realized that that technique was MUCH better than how I created my costume at the time – so I filed it away for the next attempt. Which was this year.
So I took some noodles and made a basic skeleton (just some ribs attached to a spine) & then wrapped carpet foam around it.
This is where the first problem arose: how to close the carpet foam around the skeleton. Sewing would rip the foam & duct tape doesn’t stick to it. I considered gluing it together, but would I be able to find a glue that didn’t just get absorbed into the notoriously absorbent foam?
As I was thinking about this, I was also getting increasingly worried about the second major problem I knew of – which was coloring the body after I made it. Trying to paint the last dinosaur was a HUGE pain because of the aforementioned foam absorbency. I ended up using latex house paint last time to put a paintable base coat on it, which worked but was super heavy and a ginormous pain.
Eventually, I decided to kill two birds with one stone. Both problems would be solved if I just wrapped the whole foam beast in duct tape. A. lot. of. Duct. Tape. Despite various misgivings about this plan, time was running short & so I decided to go for it. In hind sight, I wish I had tried the glue, or come up with something better.
So thus began the process of duct taping the hell out of the body. This mostly worked well and made for a pretty sturdy costume. But again, like last dino, the tail was a big problem. The first problem was that in taping it we had weird bunches around it that required more tape and more cutting of the foam & it ended up being less bunched, but also not looking right until I added more foam layers – which turned out to be fragile (the costume is currently ripping on these extra layers.
The biggest mistake, though, was in the body geometry. I should note that the dino geek in me wants to make it clear that this mistake resulted in the body having a biologically more accurate design, but was not what I wanted / needed 🙂
When we were taping up the body, we taped the tail going straight along the spine – which is anatomically accurate – it is how modern science realizes that dinos must have been shaped. But it is a horrible geometry for a human costume. I needed a geometry more like how we thought dinos looked when I was young: with the tail dragging behind, rather than waving in the air as a counter balance. Fundamentally I needed the “Man in A Godzilla Suit” look, not the “Jurassic Park Velociraptor” look. To wit:
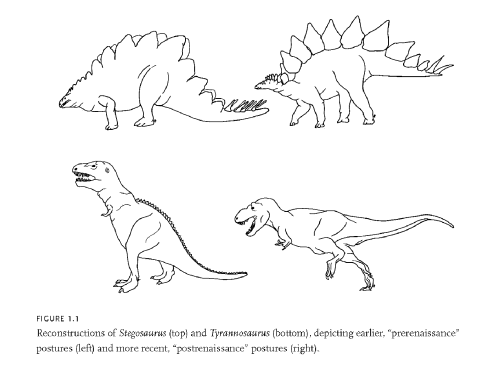
So the good news is that I made the tail anatomically correct! Straight along the spine. The bad news was that I was a guy in dino suit dammit! I needed the old-school tail drag geometry! You have no idea how much anguish this caused for me 🙂 But there was no time to fix this…. so we moved on…
After duct-tape-a-palooza, I then made the head by folding a square of thick foam around a balloon & then taping it into the shape I wanted. Then, I made a lower jaw out of another piece of thick foam & then more taping to shape it right.
I then made gloves and feet out of more foam & in the case of the feet I taped the foam around some cheap bedroom slippers I bought. These feet and gloves were MUCH better than dino 1.0’s.
That left me with a giant duct-tape-asaurus. Amusing enough – but without that essential ‘Deepness! But really, ‘Deepness is just a few bottles of glitter away! 🙂
That brought me to the next mistake, albeit not a huge deal – I started applying the glitter with Elmer’s glue – which is fine but not great for a flexible surface. Spray mount was a much better choice and I did a lot of it with spray mount. Finally, after the glitter dried, I painted the whole thing with a coat of water based polyurethane so that I wouldn’t flake off all the glitter everywhere 🙂 As it is, a week later, there is still a bit of glitter sprinkled along the hallway at work 🙂
I also added some green tights for the workday & some green sparkly pants for Halloween itself. Oh and I put LED blinky lights (from my bike) inside the yellow ping pong balls that I used for eyes. I wish there were pictures of these touches, but oh well. [Update 12/1: This video at the 30 second mark shows the eyes pretty well 🙂 – Thanks Kevin!]
And lo – Glamosaurus was born.
.ps
The irony of all this is that just like last time, as I was finishing the costume, I came up with a way to make it much better, faster and cheaper. If I had a few more days, I probably would have tried it 🙂 So this means there will be a Dino 3.0 in a few years…..
You’re definitely getting smarter about it! I thought that from looking at the pics, even before reading the blog.
And I bet your house was so much happier that you didn’t do most of it inside. Nice to have the garage as your workshop!
🙂 Amy, I think you missed this shot:
http://www.deeptrouble.com/pixpages/halloween2009/Making_of_Glamosaur.html#11
though at least I did the glitter in the garage 🙂
nope, saw it. Messes don’t get past me ; )
I was thinking of the glitter. That would have required some serious vacuuming.